Preserved Lemons Two Ways: Your Weekend Project Starter
Imagine this: you stumble upon an irresistible recipe for a Moroccan chicken tagine, or perhaps a vibrant Mediterranean salad, only to find that it calls for "preserved lemons." A pantry staple for many, yet for others, an elusive specialty item. Do you put the recipe aside? Or do you wish you had a jar ready to hand? This scenario is precisely why we're diving into the delightful world of preserved lemons today. Starting this weekend, you can embark on a simple, yet incredibly rewarding culinary journey that promises to stock your pantry with a versatile, flavour-packed ingredient. Forget the last-minute scramble; this
homemade kitchen staple is easier to make than you think, and we'll show you how with our guide to making preserved lemons two ways – your ultimate weekend project.
Why Preserved Lemons Are Your Next Kitchen Obsession
Preserved lemons are more than just a condiment; they're a flavour enhancer, a secret weapon that can elevate a myriad of dishes from ordinary to extraordinary. With roots deep in Mediterranean and Middle Eastern cooking, especially in North African cuisine where they are synonymous with the famous chicken tagine, these tangy, salty, and slightly sweet lemons bring a unique depth that fresh lemons simply can't.
Growing up in Egypt, for example, pickled items like lemons and cucumbers were a constant fixture on the dinner table, as integral as a fresh salad or tahini sauce. This rich history underscores their importance and versatility. They offer a unique umami brightness, a softened rind that melts into sauces, and a vibrant tang that cuts through rich dishes. While you might occasionally find them at a specialty grocery store or olive bar, making them at home is far more cost-effective, ensures the freshest ingredients, and allows you to customize the flavour profile. The actual hands-on work takes less than an hour – the hard part is simply waiting for nature to work its magic.
Choosing Your Path: Two Methods for Preserving Lemons
The beauty of preserved lemons lies not only in their flavour but also in the flexibility of their preparation. While the core principle remains the same – salt and time – we'll explore preserved lemons two ways, allowing you to choose based on your desired timeline and culinary preferences. Both sound promising, and with a little patience, you'll soon have jars of liquid gold ready for your next culinary adventure.
Method 1: The Accelerated Approach (Inspired by Bon Appétit)
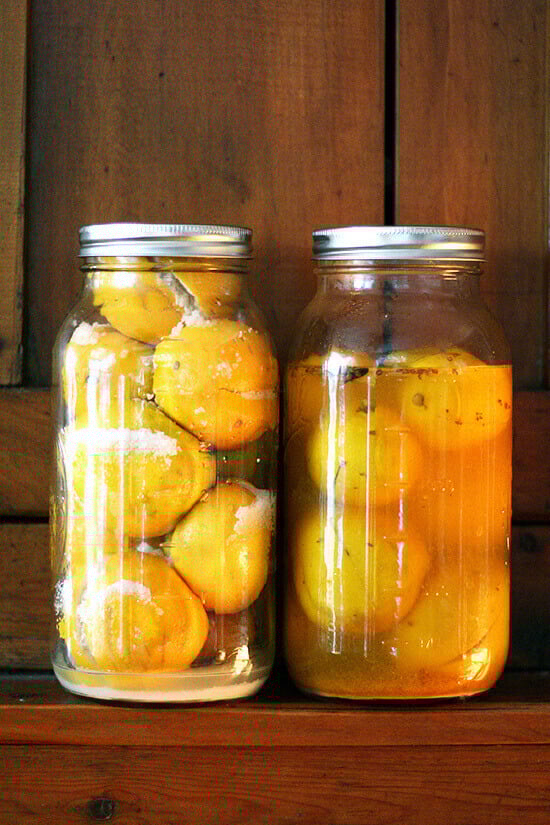
This method is perfect if you're eager to get your preserved lemons ready in a shorter timeframe, typically around two weeks. It's often characterized by cutting lemons into quarters, halves, or even slices, and then packing them tightly with a generous amount of salt. The goal is to quickly draw out the lemon's juices and create a brine that will tenderize and flavour the fruit.
*
Ready In: Approximately 2 weeks.
*
Key Characteristic: Faster curing time, often results in a slightly firmer texture initially.
*
Ideal For: Those who need preserved lemons relatively quickly, or prefer a less intensely softened rind.
Method 2: The Traditional, Deeply Flavored Way (Jerusalem/Moroccan Inspired)
This is often considered the more classic approach, yielding deeply complex flavours and a wonderfully softened rind. This method typically takes a bit longer, usually 3-4 weeks, but the wait is incredibly rewarding. It often involves cutting the lemons into quarters but leaving them attached at the base, stuffing them generously with salt, and packing them very tightly into jars to create their own brine.
*
Ready In: 3 to 4 weeks.
*
Key Characteristic: Deeper flavour development, incredibly soft and melt-in-your-mouth rind.
*
Ideal For: Classic tagines, stews, or recipes where the preserved lemon is a star ingredient, offering intense flavour and texture.
*
Lemon Choice: While any organic, unwaxed lemon works, Meyer lemons are often highlighted for their thinner skin, making them ideal for this method. However, traditional lemons like Eureka or Lisbon are perfectly suitable and more cost-effective, a tip often used in professional kitchens.
Essential Ingredients & Equipment for Your Weekend Project:
*
Lemons: Opt for organic, unwaxed lemons. This is crucial as you'll be consuming the rind. Meyer lemons are excellent, but standard lemons work beautifully too.
*
Salt: Use coarse sea salt or kosher salt. Avoid iodized table salt, as it can make the lemons cloudy or impart an undesirable metallic flavour.
*
Jars: Sterilized glass jars with airtight lids (Mason jars are perfect).
*
Optional Enhancements: For an extra layer of flavour, consider adding a dried chili, a sprig of fresh rosemary, bay leaves, or a few peppercorns after the initial curing period (typically after one week).
The Simple Steps: Your Preserved Lemons Weekend Project Breakdown
Regardless of which of the preserved lemons two ways you choose, the preparation steps are delightfully straightforward. This is truly a "weekend project" in that you dedicate a small block of time to prepare, and then let time do the rest.
Step 1: Meticulous Preparation
Begin by thoroughly washing and scrubbing your lemons under hot running water. You want to remove any dirt or residue. Next, sterilize your glass jars and lids. You can do this by running them through a dishwasher's sanitizing cycle, boiling them in water for 10 minutes, or placing them in a 275°F (135°C) oven for 15-20 minutes. Ensure they are completely dry before use.
Step 2: Slicing and Salting – The Heart of the Process
*
For the Traditional Method: Trim the ends of each lemon. Stand the lemon upright and make two deep cuts lengthwise, forming quarters, but *do not cut all the way through* the bottom, leaving about a half-inch intact. It should resemble a flower or bloom. Pry open the lemon and generously stuff the inside flesh with salt. Repeat with all lemons.
*
For the Accelerated Method: You can cut the lemons into halves, quarters, or thick slices/rounds. Place a layer of salt at the bottom of your sterilized jar. Then, layer the lemon pieces with generous amounts of salt in between each layer.
Step 3: Packing the Jars
This is where the "stuffing" part comes in!
* Place the salt-stuffed lemons (from either method) into your sterilized jar(s). Pack them *very tightly*, pressing down firmly with a spoon or your fist (ensure your hand is clean!). The goal is to squeeze out as much juice as possible. The lemons should release their own brine.
* If, after packing tightly, the lemons aren't fully submerged in their own juice, top off the jar with freshly squeezed lemon juice (ensure it's from organic lemons).
* Leave about an inch of headspace at the top of the jar.
* Seal the jars tightly.
Step 4: The Waiting Game and Optional Enhancements
Store your jars in a cool, dark place (like a pantry). For the first week, flip the jars upside down daily, or at least once every couple of days, to ensure the salt and juice are evenly distributed and to help prevent mold. After about one week, if you wish to add extra aromatics, open the jar and tuck in a dried chili or ½ teaspoon of crushed red pepper flakes and a sprig of rosemary. Reseal and continue curing.
Then comes the patience! Your accelerated lemons will be ready in approximately 2 weeks, while the traditional method requires 3 to 4 weeks. During this time, the rinds will soften, and the flavour will deepen significantly. Trust the process; the wait is absolutely worth it for the incredible flavour payoff. If you're excited to learn more about the timeline, check out
Why You Need Preserved Lemons Now: Tagine Ready in Weeks.
Beyond the Jar: Unleashing the Flavor with Preserved Lemon Puree and More
Once your preserved lemons are ready, a whole new world of culinary possibilities opens up. Store them in the refrigerator, where they will last for many months, even a year or longer!
The Purée Revelation: A Game-Changer
A fantastic tip, gleaned from chefs experienced in Moroccan cuisine, is to purée your preserved lemons. Simply take your entire batch of preserved lemons (lemons, salt, and juice) and whiz them in a food processor until smooth. This creates a versatile purée that lasts even longer and is incredibly easy to incorporate into dishes. A spoonful of this purée can instantly brighten a stew, a dressing, or a marinade, distributing that unique preserved lemon flavour evenly throughout your dish.
To Rinse or Not to Rinse?
For whole or sliced preserved lemons, it's generally recommended to rinse them under cold water before using. This helps to remove excess salt, which can be quite intense. However, if you're making a purée, especially one you intend to use sparingly for concentrated flavour, some chefs recommend *not* rinsing, allowing that salty intensity to become part of the flavour profile of the purée. Experiment to find your preference!
Creative Culinary Uses:
*
Tagines & Stews: The classic pairing. The softened rind melts into the sauce, adding a beautiful tang.
*
Roasted Meats & Vegetables: Mince the rind and add to marinades for chicken, lamb, or fish. It's fantastic with roasted potatoes, carrots, or Brussels sprouts.
*
Salad Dressings & Vinaigrettes: Finely chop the rind or use a touch of purée to add complexity to your dressings.
*
Gremolata & Compound Butters: Replace fresh lemon zest with minced preserved lemon in a gremolata, or whip it into butter for a flavourful spread for bread or grilled fish.
*
Sandwiches & Grain Bowls: A thin slice or a smear of purée can elevate an everyday meal.
*
Cocktails: Use a sliver of preserved lemon rind as a garnish, or rub the rim of your glass with it for a unique salty-tangy twist.
Starting your preserved lemons two ways weekend project this weekend is an investment in future flavour. It's a simple, hands-on task that yields immense culinary rewards, transforming humble lemons into a powerful pantry staple. So gather your ingredients, sterilize those jars, and prepare to embark on a delicious journey that will infuse your cooking with a touch of Mediterranean magic for months to come.